Showing posts with label baking. Show all posts

Friday, March 19, 2010

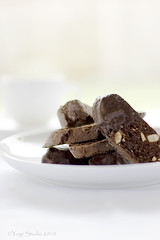
Chocolate Hazelnut Biscotti


This blog has been moved and renamed. The new name is Jasmine Tea. Please visit this post at http://www.jasmineteablog.com/2010/03/chocolate-hazelnut-biscotti.html


Have you ever dreamt of owning a coffee shop? Aside from being a musician, a photographer, a journalist, owning a coffee shop has been one of my dreams in my adult life.  The warm cozy decor, the earthy aroma of coffee, the sweet treats, the chit chatting with customers, there is just something irresistible about a nice family run coffee shop in your neighborhood.  This afternoon, after the baking in the morning, I made myself a nice cup of coffee, sitting on the patio, served with these delectable chocolate biscotti, watching Yogi, our dog, running around in the yard, I let my dream took over me again. After quitting my job for over ten years in the corporate world, what is my next step? Is there a possibility to realize my dream?

If I have a coffee shop, these biscotti will definitely be on the menu. The chocolate coatings make them a special treats. But it is still delicious even without the coatings.  They are easy to make. All you have to do is to mix the wet ingredients and then dump the dry ingredients into the wet ones and mix them together. Then you have to wait for them to bake twice under low temperature. It is always tempted to try a few pieces after the first bake is done. The most difficult part of the recipe is to peel the hazelnuts. Please see my kitchen notes below . 

Recipe:  Chocolate-Hazelnut Biscotti
Adapted from Williams-Sonoma website 

Ingredients:
4         oz   semisweet chocolate, coarsely chopped
1         cup firmly packed light brown sugar
1 3/4   cup unbleached all-purpose flour
1/3      cup unsweetened cocoa, preferably Dutch process
1 1/2   Tbsp instant espresso powder
1         tsp baking soda
1/4      tsp salt
3         eggs
1 1/4   tsp vanilla extract
1/2      tsp almond extract
1         cup hazelnuts, toasted and coarsely chopped

For the chocolate coatings:
4         oz semisweet or bittersweet chocolate, chopped*
1         tsp. vegetable shortening*

Directions:
  1. Preheat oven to 300ºF. Line a large baking sheet with parchment paper/wax paper/silpat. 
  2. In a food processor fitted with the metal blade, combine the chocolate and brown sugar and process until the chocolate is very fine; set aside. 
  3. Sift together the flour, cocoa, expresso powder, baking soda and salt into a bowl; set aside. 
  4. Add eggs, vanilla extract and almond extract in the workbowl of an electric mixer. Beat the egg mixture on medium speed until blend.
  5. Add sugar, beat until blend.
  6. Reduce speed to low, add flour mixture, mix until a stiff dough forms, adding the hazelnuts when the dough is about half mixed.
  7. On a floured surface, divide the dough in half. Form each half into a log 12 inches long. Transfer the logs to the prepared baking sheet, spacing them well apart, and pat to even the shapes. Bake until almost firm to the touch, about 50 minutes (logs will spread during baking). Remove from the oven and let cool for 10 minutes. Leave the oven set at 300ºF. 
  8. Using a spatula, carefully transfer the logs to a work surface. Using a serrated knife, cut logs on the diagonal into slices 1/2 to 3/4 inch thick. Arrange the slices, cut side down, on the baking sheet. Bake for 25 minutes.*
  9. Turn the slices over and bake until crisp and dry, about 25 minutes more. Turn off the oven and let the biscotti cool completely in the oven with the door slightly ajar.

    For the chocolate coatings:*
    1. Combine the chocolate and shortening in a microwave safe bowl.  Microwave at 80% power for 30 sec. Take out and stir with a wooden spoon. Microwave for another 30 sec at 80% power.  Take out and stir.  Depend on the power of your microwave oven, if large chunks of chocolate remains, you can keep melting the chocolate at 50% to 80% power for 10-15sec for 2 to 3 times more. But each time, give it a good stir and let the heat retained in the mixture to do the job of melting first before putting in the microwave again.  For 4 oz chocolate, it takes me about three 15sec rounds in the microwave and enough heat is retained in the mixture to melt all the chocolate completely. Be careful, do not over heat the chocolate.
    2. Holding one tip of the cooled cookie, using a wooden spoon to coat another tip end of the cookie with the hot chocolate. Let it set on a cooling rack on top of a baking sheet. Refrigerate until set. Store in an airtight container in the refrigerator for up to 2 weeks. 
     * See kitchen notes

    • How to peel hazelnuts? To peel the hazelnuts, toast them at 350ºF for 10 to 12 mins.  Wrap them in a tea towel and wait for the hazelnuts to cool down. Then, you can either rub the hazelnuts with the tea towel or rub them between your palms. You should work closely to a sink so that you can blow away the skin easily. This is not a perfect way. Some skins may still attached to the nuts but they do not affect the taste and texture of the cookies at all. There is another way to peel them by blanching the nuts with baking soda before toasting.  I have not tested that before.  If you have tried that or if you have other better ways, please let me know.   
    • The dough is quite sticky.  Use a wooden spoon instead of a spatula to scrape the dough out from the mixing bowl to the work surface. 
    • The work surface and your hands have to be heavily floured (but don't be excessive) in order to work the dough easily. 
    • The original recipe uses 8 oz of chocolate for the coatings and applies the coatings to one side of the cookie instead of the tip end of both sides.  It is your preference to decide how much coating and where you want it to apply.
    • These are the more crispy and crunchy biscotti made without butter. Therefore, be forewarned that they are quite hard in texture. You can slide it thinner to do the second bake. 1/2" is a good thickness.
         

      Friday, March 5, 2010

      Mini Chicken Pot Pie

      mini chicken pot pie

      This blog has been renamed and moved. The new name is Jasmine Tea.  Please visit this post at http://www.jasmineteablog.com/2010/03/mini-chicken-pot-pie.html

      Going hungry can prolong life?  Just read an article on the recent Time Magazine discussing the research on restricting calories and living longer.  That seems to make sense.  The body of a human beings was originally built to conduct enormous physical activities for hunting and gathering food and to withstand the hardships caused by scarcity of food.  Abundance causes all sorts of problems.  Even my mom, a traditional health conscious Chinese woman who does not care much about western medicine, has always been telling my dad and everybody not to eat to a full stomach, 80% is sufficient. I think that is the Chinese attitude towards everything in life and I follow it as well. Moderation is the key. 

      And here is the way to enjoy all the yummy food that you can have: portion control. Specially made for my hubby, N, is this mini chicken pot pie, hoping that he will adopt the principle of moderation. This is a recipe from The Best Recipe by the Cooks Illustrated Magazine. 

      Kitchen notes:  I have made this several times with a big baking pan.  This time, I made the individual portion size.  I only used up half of the ingredients for making four mini pies.  The rest of the pie dough and fillings are in the freezer.  I will see how they hold up.  As for the pie dough,  Since unsalted butter is used in the fillings, quite a bit of salt has to be added.  Please taste the fillings and adjust to your personal taste. This is a pretty basic recipe.  You can vary the types of vegetables such as adding mushrooms or herbs to suit you own taste.  The white wine (I don't have dry sherry) really enhances the flavor.  Don't skip it!   

      Chicken Pot Pie
      Serves 6 to 8
      Adapted from The Best Recipe by the Cooks Illustrated Magazine
      Pie Dough
      1 1/2
      Cups unbleached all purpose flour
      1/2
      tsp salt
      8
      tbsp unsalted butter (1/4 pound), chilled and cut into 1/4-inch pieces
      4
      tbsp vegetable shortening , chilled

      Chicken Pot Pie
      1 1/2
      lb boneless skinless chicken breast or boneless, skinless chicken thighs
      1
      can low sodium chicken broth, with water added to equal 2 cups (or use 2 cups homemade chicken broth)
      1 1/2
      tbsp vegetable oil
      1
      large onion , chopped fine
      3
      medium carrots , peeled and cut crosswise 1/4-inch thick
      2
      small ribs celery , cut crosswise 1/4-inch thick
      4
      tbsp unsalted butter
      1/2
      cup unbleached all purpose flour
      1 1/2
      cups milk
      1/2
      teaspoon dried thyme
      4
      tbsp white wine or dry sherry
      3/4
      cup frozen peas, thawed
      3
      tbsp minced fresh parsley leaves

      Directions:

      To make the pie dough: 
      1. Mix flour and salt, put mixture in food processor.
      2. Scatter butter pieces over flour mixture, tossing to coat butter with a little of the flour. Cut butter into flour with five one-second pulses. 
      3. Add shortening; continue cutting in until flour is pale yellow and resembles coarse cornmeal, keeping some butter bits the size of small peas, about four more one-second pulses. Turn mixture into medium bowl.
      4. Sprinkle 3 tbsp ice-cold water over mixture. Using rubber spatula, fold water into flour mixture. Then press down on dough mixture with broad side of spatula until dough begins to stick together. Test the dough with your finger by squeezing a small portion between your finger.  If the dough is moist and comes together, then pour the dough onto a floured work surface. If not, add 1 to 2 more Tbsp of ice cold water.
      5. On the work surface, gather the half crumbled dough together and shape it into a ball and then flatten into 4" wide disk.  Wrap in plastic and refrigerate 30mins or longer while preparing pie filling. 
        To make the pie filling:
        1. Adjust oven rack to low-center position; heat oven to 400 degrees. 
        2. Cook chicken with broth - Put chicken and broth in medium size pot over medium heat. Cover, bring to simmer; simmer until chicken is just done, 8 to 10 minutes. Transfer meat to large bowl, reserving broth in measuring cup.
        3. Cook veggies - Increase heat to medium-high; heat oil in now-empty pan. Add onions, carrots, and celery; sauté until just tender, about 5 minutes. Season to taste with salt and pepper. 
        4. Shred meat - While vegetables are sautéing, shred meat into bite-sized pieces. Transfer cooked vegetables to bowl with chicken; set aside.
        5. Make sauce - Heat butter over medium heat in again-empty skillet. When foaming subsides, add flour; cook about 1 minute. Whisk in chicken broth, milk, any accumulated chicken juices, and thyme. Bring to simmer, then continue to simmer until sauce fully thickens, about 1 minute. Season to taste with salt and pepper; stir in wine.
        6. Pour sauce over chicken mixture; stir to combine. Stir in peas and parsley. Adjust seasonings.  Fillings can be made ahead and refrigerated.
        To assemble:
        1. Roll dough on floured surface to approximately 1/8-inch thick.. Put individual ramekins upside down on dough. Using a pair of scissors, cut dough rounds about 1/2" to 3/4" larger than the size of the ramekins. Depending on the size of the ramekins, you should be able to get 6 to 8 rounds.
        2. Pour chicken mixture into each ramekin. Lay dough round over pot pie filling. Press overhanging dough against the edge of the ramekins to seal it. Cut four 1/2" vent holes of one1-inch vent hole on the dough topping.
        3. Bake until pastry is golden brown and filling is bubbly, about 25 to 30 minutes for smaller pies. Serve hot.