
As of today, I will be changing the name of this blog from Babooblah to Jasmine Tea and the blog address will be moving to:
The old nameis meant to be a spontaneous creation without much thoughts, and just for the fun of stepping into the blogger world to take a peek. Now, after 6 posts, I think I love what I've been doing and I should give the blog a better name. Jasmine tea is one of my favorite tea which has a mild fragrant and soothing flavor that can accompany any meals or desserts, and it is just as good by itself. I hope this blog can be just like that. I will also be communicating using my name, Grace, instead of Baboo. If there are any questions, please email me at jasmineteablog@yahoo.com. Thank you.
Friday, March 26, 2010
Tuesday, March 23, 2010
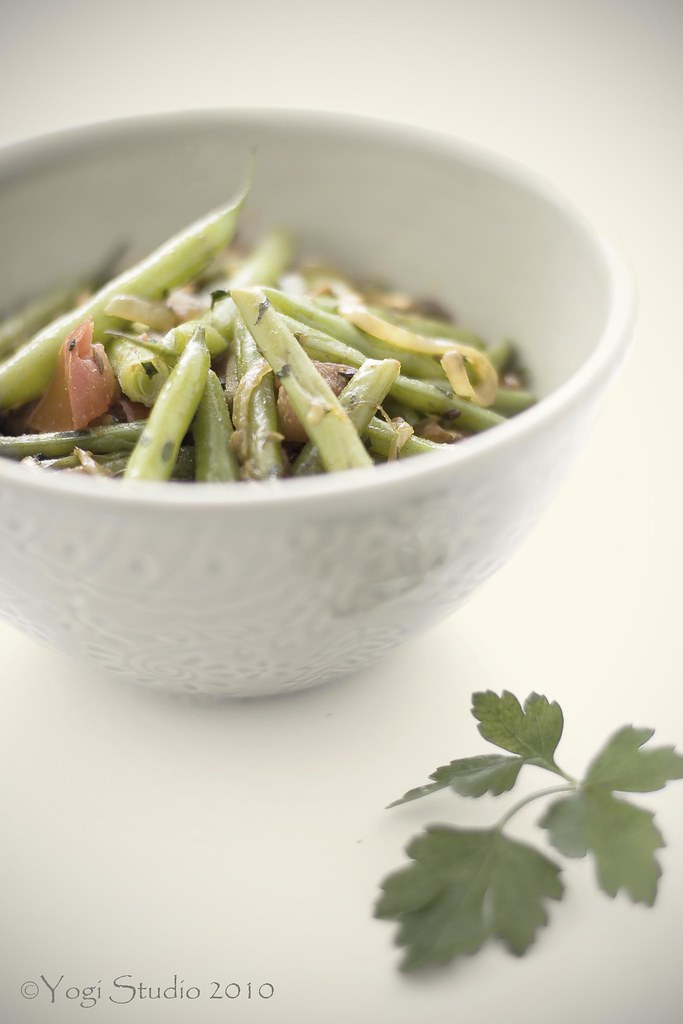
Green Beans with Cumin and Fennel
This blog has been renamed and moved. The new name is Jasmine Tea. Please visit this post at http://www.jasmineteablog.com/2010/03/green-beans-with-cumin-and-fennel.html
I like learning how to make Indian dishes because I like playing around with spices. I feel like a witch using magic ingredients to make potion. This simple vegetable dish is very similar to Chinese stir-fry. You put the aromatics in, then the veggies, then the seasoning, some liquids, cover and wait, and then there it is, a magic potion for me to revitalize my day. I need veggies everyday.
Kitchen notes: I did not change much about the recipe since this is such a simple one. I did increase the turmeric by a small amount because I like the smell of it. I also substituted parsley with cilantro because I did not have cilantro on hand. But please do use cilantro. It gives a nice touch to the dish.
magic ingredients
Recipes: Green Beans with Cumin and Fennel
Adapted from World Vegetarian by Madhur Jaffrey
Ingredients:
3 Tbsp canola oil
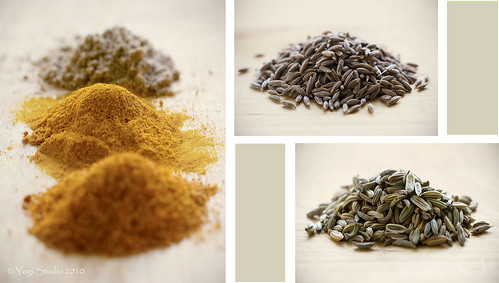
1 tsp whole cumin seeds
1 tsp whole fennel seeds
2 good-sized shallots or 1 small onion, peeled and cut into fine slices
1 garlic clove, peeled and cut into fine slices
1 1" piece of fresh ginger, peeled and cut into very fine slivers
1 lb green beans, cut into 1" pieces
1 tsp ground coriander
1 tsp ground cumin
1/4 tsp ground turmeric
1/4 tsp cayenne
1/2 cup water
3/4 tsp salt
1 small tomato, chopped
3 Tbsp fresh cilantro, minced
Directions:
- Heat oil in a large saute pan over medium high heat. When the oil is very hot but not smoking, add the whole cumin and fennel seeds. Stir for a few seconds and then add the shallots, garlic and ginger. Stir for a minute or until lightly browned.
- Add the beans and stir for another 2 mins.
- Add the coriander, cumin, turmeric and cayenne and stir for a few seconds.
- Add water and salt and bring it to simmer. Stir and cover. Turn the heat down to low and let it simmer for 5 mins.
- Add the tomato and cilantro. Stir and cover. Cook for another 4 to 5 mins oruntil the green beans are tender.
Friday, March 19, 2010
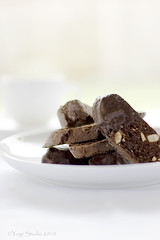
Chocolate Hazelnut Biscotti

This blog has been moved and renamed. The new name is Jasmine Tea. Please visit this post at http://www.jasmineteablog.com/2010/03/chocolate-hazelnut-biscotti.html
Have you ever dreamt of owning a coffee shop? Aside from being a musician, a photographer, a journalist, owning a coffee shop has been one of my dreams in my adult life. The warm cozy decor, the earthy aroma of coffee, the sweet treats, the chit chatting with customers, there is just something irresistible about a nice family run coffee shop in your neighborhood. This afternoon, after the baking in the morning, I made myself a nice cup of coffee, sitting on the patio, served with these delectable chocolate biscotti, watching Yogi, our dog, running around in the yard, I let my dream took over me again. After quitting my job for over ten years in the corporate world, what is my next step? Is there a possibility to realize my dream?
If I have a coffee shop, these biscotti will definitely be on the menu. The chocolate coatings make them a special treats. But it is still delicious even without the coatings. They are easy to make. All you have to do is to mix the wet ingredients and then dump the dry ingredients into the wet ones and mix them together. Then you have to wait for them to bake twice under low temperature. It is always tempted to try a few pieces after the first bake is done. The most difficult part of the recipe is to peel the hazelnuts. Please see my kitchen notes below .
Recipe: Chocolate-Hazelnut Biscotti
Adapted from Williams-Sonoma website
Ingredients:
4 oz semisweet chocolate, coarsely chopped
1 cup firmly packed light brown sugar
1 3/4 cup unbleached all-purpose flour
1/3 cup unsweetened cocoa, preferably Dutch process
1 1/2 Tbsp instant espresso powder
1 tsp baking soda
1/4 tsp salt
3 eggs
1 1/4 tsp vanilla extract
1/2 tsp almond extract
1 cup hazelnuts, toasted and coarsely chopped
For the chocolate coatings:
4 oz semisweet or bittersweet chocolate, chopped*
1 tsp. vegetable shortening*
Directions:
- Preheat oven to 300ºF. Line a large baking sheet with parchment paper/wax paper/silpat.
- In a food processor fitted with the metal blade, combine the chocolate and brown sugar and process until the chocolate is very fine; set aside.
- Sift together the flour, cocoa, expresso powder, baking soda and salt into a bowl; set aside.
- Add eggs, vanilla extract and almond extract in the workbowl of an electric mixer. Beat the egg mixture on medium speed until blend.
- Add sugar, beat until blend.
- Reduce speed to low, add flour mixture, mix until a stiff dough forms, adding the hazelnuts when the dough is about half mixed.
- On a floured surface, divide the dough in half. Form each half into a log 12 inches long. Transfer the logs to the prepared baking sheet, spacing them well apart, and pat to even the shapes. Bake until almost firm to the touch, about 50 minutes (logs will spread during baking). Remove from the oven and let cool for 10 minutes. Leave the oven set at 300ºF.
- Using a spatula, carefully transfer the logs to a work surface. Using a serrated knife, cut logs on the diagonal into slices 1/2 to 3/4 inch thick. Arrange the slices, cut side down, on the baking sheet. Bake for 25 minutes.*
- Turn the slices over and bake until crisp and dry, about 25 minutes more. Turn off the oven and let the biscotti cool completely in the oven with the door slightly ajar.

For the chocolate coatings:*
- Combine the chocolate and shortening in a microwave safe bowl. Microwave at 80% power for 30 sec. Take out and stir with a wooden spoon. Microwave for another 30 sec at 80% power. Take out and stir. Depend on the power of your microwave oven, if large chunks of chocolate remains, you can keep melting the chocolate at 50% to 80% power for 10-15sec for 2 to 3 times more. But each time, give it a good stir and let the heat retained in the mixture to do the job of melting first before putting in the microwave again. For 4 oz chocolate, it takes me about three 15sec rounds in the microwave and enough heat is retained in the mixture to melt all the chocolate completely. Be careful, do not over heat the chocolate.
- Holding one tip of the cooled cookie, using a wooden spoon to coat another tip end of the cookie with the hot chocolate. Let it set on a cooling rack on top of a baking sheet. Refrigerate until set. Store in an airtight container in the refrigerator for up to 2 weeks.
- How to peel hazelnuts? To peel the hazelnuts, toast them at 350ºF for 10 to 12 mins. Wrap them in a tea towel and wait for the hazelnuts to cool down. Then, you can either rub the hazelnuts with the tea towel or rub them between your palms. You should work closely to a sink so that you can blow away the skin easily. This is not a perfect way. Some skins may still attached to the nuts but they do not affect the taste and texture of the cookies at all. There is another way to peel them by blanching the nuts with baking soda before toasting. I have not tested that before. If you have tried that or if you have other better ways, please let me know.
- The dough is quite sticky. Use a wooden spoon instead of a spatula to scrape the dough out from the mixing bowl to the work surface.
- The work surface and your hands have to be heavily floured (but don't be excessive) in order to work the dough easily.
- The original recipe uses 8 oz of chocolate for the coatings and applies the coatings to one side of the cookie instead of the tip end of both sides. It is your preference to decide how much coating and where you want it to apply.
- These are the more crispy and crunchy biscotti made without butter. Therefore, be forewarned that they are quite hard in texture. You can slide it thinner to do the second bake. 1/2" is a good thickness.
Subscribe to:
Posts (Atom)

